Rayhunter

Rayhunter is a project for detecting IMSI catchers, also known as cell-site simulators or stingrays. It was first designed to run on a cheap mobile hotspot called the Orbic RC400L, but thanks to community efforts can support some other devices as well. It's also designed to be as easy to install and use as possible, regardless of your level of technical skills. This guide should provide you all you need to acquire a compatible device, install Rayhunter, and start catching IMSI catchers.
→ Check out the installation guide to get started.
→ To learn more about the aim of the project, and about IMSI catchers in general, please check out our introductory blog post.
→ For discussion, help, or to join the mattermost channel and get involved with the project and community check out the many ways listed here!
LEGAL DISCLAIMER: Use this program at your own risk. We believe running this program does not currently violate any laws or regulations in the United States. However, we are not responsible for civil or criminal liability resulting from the use of this software. If you are located outside of the US please consult with an attorney in your country to help you assess the legal risks of running this program.
Good Hunting!
Support, Feedback, and Community
If you're using Rayhunter (or trying to), we'd love to hear from you! Check out one of the following forums for contacting the Rayhunter developers and community:
-
If you've received a Rayhunter warning, please send your Rayhunter data captures (the ZIP file) to us at our Signal username ElectronicFrontierFoundation.90 with the following information: capture date, capture location, device, device model, and Rayhunter version.
Note that the recording files are sensitive data and contain location information, so we strongly recommend against posting them to publicly.
If you're unfamiliar with Signal, feel free to check out our Security Self Defense guide on it.
-
If you're having issues installing or using Rayhunter, consider checking the Frequently Asked Questions page for answers to common questions.
-
If your question isn't answered there, please open an issue on our Github repo.
-
If you'd like to propose a feature, heuristic, or device for Rayhunter, start a discussion in our Github repo
-
For anything else, join us in the
#rayhunteror#rayhunter-developerschannel of EFF's Mattermost instance to chat!
Frequently Asked Questions
Do I need an active SIM card to use Rayhunter?
It Depends. Operation of Rayhunter does require the insertion of a SIM card into the device, but that sim card does not have to be actively registered with a service plan. If you want to use the device as a hotspot in addition to a research device, or get notifications, an active plan would of course be necessary.
If I am located outside of the United States, should I use the SIM card that came with my device?
We recommend using a SIM card from a carrier from whichever country you are located in.
How can I test that my device is working?
You can enable the Test Heuristic under Analyzer Heuristic Settings in the config section on your web dashboard. This will cause an alert to trigger every time your device sees a cell tower, you might need to reboot your device or move around a bit to get this one to trigger, but it will be very noisy once it does. People have also tested it by building IMSI catchers at home, but we don't recommend that, since it violates FCC regulations and will probably upset your neighbors.
Help, Rayhunter's line is red/orange/yellow/dotted/dashed! What should I do?
Unfortunately, the circumstances that might lead to a positive cell site simulator (CSS) signal are quite varied, so we don't have a universal recommendation for how to deal with a positive signal. Depending on your circumstances and threat model, you may want to turn off your phone until you are out of the area and tell your friends to do the same!
If you've received a Rayhunter warning and would like to help us with our research, please send your Rayhunter data captures (Zip file downloaded from the web interface) to us at our Signal username ElectronicFrontierFoundation.90 with the following information: capture date, capture location, device, device model, and Rayhunter version. If you're unfamiliar with Signal, feel free to check out our Security Self Defense guide on it.
Please note that this file may contain sensitive information such as your IMSI and the unique IDs of cell towers you were near which could be used to ascertain your location at the time.
Should I get a locked or unlocked orbic device? What is the difference?
If you want to use a non-Verizon SIM card you will probably need an unlocked device. But it's not clear which devices are locked nor how to unlock them, we welcome any experimentation and information regarding the use of unlocked devices. So far most verizon branded orbic devices we have encountered are actually unlocked.
I can't reach my Rayhunter's web UI after leaving it alone for a while
Some hotspots (notably the T-Mobile TMOHS1 and Wingtech CT2MHS01) shut down their Wi-Fi access point after about 10 minutes with no connected clients to save battery. Rayhunter is still recording in the background, but you won't be able to reach the web UI until you power cycle the device or reconnect a client while Wi-Fi is still up.
To avoid this, set Wi-Fi Standby to "Always on" in the hotspot's native admin UI. See TMOHS1 or CT2MHS01 for step-by-step instructions.
How do I re-enable USB tethering after installing Rayhunter?
If you have installed with ./installer orbic-usb, you might find that USB
tethering is now disabled. If you have run ./installer orbic, this section is not
relevant as it does not use or touch USB.
First obtain a shell, then:
# inside of Orbic's shell:
echo 9 > /usrdata/mode.cfg
reboot
Make sure USB tethering is also enabled in the Orbic's UI.
To disable tethering again:
# inside of Orbic's shell:
echo 3 > /usrdata/mode.cfg
reboot
See /data/usb/boot_hsusb_composition for a list of USB modes and Android USB gadget settings.
How do I connect my device to an existing WiFi network?
The Orbic, Moxee, UZ801, and TMOHS1 can connect to a nearby WiFi network while still running their own hotspot. This gives the device internet access for ntfy notifications and lets you reach the web UI from your home network. See WiFi Client Mode in the configuration guide for setup instructions.
WiFi client mode is connected but I can't reach the internet
Check that the DNS Servers field in the config has valid entries (the default is 9.9.9.9 and 149.112.112.112). If your home network and the device hotspot use the same subnet (for example, both are on 192.168.1.x), try restarting the daemon by saving the config again from the web UI.
How do I disable the WiFi hotspot on the Orbic RC400L?
To disable both WiFi bands, first obtain a shell, then:
# inside of Orbic's shell:
sed -i 's/<wlan><Feature><state>1<\/state>/<wlan><Feature><state>0<\/state>/g' /usrdata/data/usr/wlan/wlan_conf_6174.xml && reboot
To re-enable WiFi:
# inside of Orbic's shell:
sed -i 's/<wlan><Feature><state>0<\/state>/<wlan><Feature><state>1<\/state>/g' /usrdata/data/usr/wlan/wlan_conf_6174.xml && reboot
Installing Rayhunter
So, you've got one of the supported devices, and are ready to start catching IMSI catchers. You have two options for installing Rayhunter:
Already have Rayhunter installed but looking to update?
Installing from the latest release
Make sure you've got one of Rayhunter's supported devices. These instructions have only been tested on macOS and Ubuntu 24.04. If they fail, you will need to install Rayhunter from source.
-
For the TP-Link only, insert a FAT-formatted SD card. This will be used to store all recordings.
-
Download the latest
rayhunter-vX.X.X-PLATFORM.zipfrom the Rayhunter releases page for your platform:- for Linux on x64 architecture:
linux-x64 - for Linux on ARM64 architecture:
linux-aarch64 - for Linux on armv7/v8 (32-bit) architecture:
linux-armv7 - for MacOS on Intel (old macbooks) architecture:
macos-intel - for MacOS on ARM (M1/M2 etc.) architecture:
macos-arm - for Windows:
windows-x86_64
- for Linux on x64 architecture:
-
Decompress the
rayhunter-vX.X.X-PLATFORM.ziparchive. Open the terminal and navigate to the folder. (Be sure to replace X.X.X with the correct version number!)unzip ~/Downloads/rayhunter-vX.X.X-PLATFORM.zip cd ~/Downloads/rayhunter-vX.X.X-PLATFORMOn Windows you can decompress using the file browser, then navigate to the folder that contains
installer.exe, hold Shift, Right-Click inside the folder, then click "Open in PowerShell". -
Connect to your device.
First turn on your device by holding the power button on the front.
Then connect to the device using either WiFi or USB tethering.
You know you are in the right network when you can access http://192.168.1.1 (Orbic) or http://192.168.0.1 (TP-Link) and see the hardware's own admin menu.
-
On MacOS only, you have to run
xattr -d com.apple.quarantine installerto allow execution of the binary. -
Run the installer.
# For Orbic: ./installer orbic --admin-password 'mypassword' # Important notes: # - the arguments --admin-username 'myusername' and --admin-ip 'mydeviceip' # may be required if different from the default. # - on Windows this command should be run in PowerShell and not the Command # Prompt (CMD) where characters like quotes are treated differently. # For TP-Link: ./installer tplink- On Verizon Orbic, the default password is the WiFi password. You can reset the password by pressing the button under the back case until the unit restarts.
- Note: If you have changed the device username, password, or IP address from their default values, these must be provided as arguments to the installer command above.
- TP-Link does not require an
--admin-passwordparameter.
For other devices, check
./installer --helpor the respective page in the sidebar under "Supported Devices" for the installation command. - On Verizon Orbic, the default password is the WiFi password. You can reset the password by pressing the button under the back case until the unit restarts.
-
The installer will eventually tell you it's done, and the device will reboot.
-
Rayhunter should now be running! You can verify this by viewing Rayhunter's web UI. You should also see a green line flash along the top of top the display on the device.
Troubleshooting
-
If you are having trouble installing Rayhunter and you're connecting to your device over USB, try using a different USB cable to connect the device to your computer. If you are using a USB hub, try using a different one or directly connecting the device to a USB port on your computer. A faulty USB connection can cause the Rayhunter installer to fail.
-
You can test your device by enabling the test heuristic. This will be very noisy and fire an alert every time you see a new tower. Be sure to turn it off when you are done testing.
-
On MacOS if you encounter an error that says "No Orbic device found," it may because you have the "Allow accessories to connect" security setting set to "Ask for approval." You may need to temporarily change it to "Always" for the script to run. Make sure to change it back to a more secure setting when you're done.
./installer --help
./installer util --help
Installing from source
Building Rayhunter from source, either for development or otherwise, involves a number of external dependencies. Unless you need to do this, we recommend you use our compiled builds.
At a high level, we have:
- A JS frontend written in SvelteKit (
./daemon/web/) - A Rust binary
rayhunter-daemon(./daemon/) that runs on the device, and bundles the frontend. - A Rust binary
installer(./installer) that runs on the computer and bundlesrayhunter-daemon.
It's recommended to work either on Mac/Linux, or WSL on Windows.
Building frontend and backend
First, install dependencies:
- Rust
- Node.js/npm
- C compiler tools (
apt install build-essentialon Linux,xcode-select --installon Mac)
Then you can build everything with:
./scripts/build-dev.sh
./scripts/install-dev.sh orbic  # replace 'orbic' with your device type
Running the daemon on your PC
If you don't have a target device handy, you can run rayhunter-daemon on your
PC with debug_mode = true. This skips DIAG, the device display, key input,
the battery worker, and the WiFi client, so recording-related endpoints will
not work, but the frontend and read-only APIs do.
mkdir -p ./qmdl && printf 'entries = []\n' > ./qmdl/manifest.toml
cat > config.toml <<'EOF'
qmdl_store_path = "./qmdl"
port = 8080
debug_mode = true
EOF
cargo run -p rayhunter-daemon -- ./config.toml
Open http://127.0.0.1:8080.
Hot-reloading the frontend
If you are working on the frontend, you normally have to repeat all of the above steps everytime to see a change.
You can instead run the frontend separately on your PC while the Rust parts continue running on your target device:
cd daemon/web

# Assumes rayhunter-daemon is listening on localhost:8080
npm run dev

# Use a custom target IP:port where the backend runs
API_TARGET=http://192.168.1.1:8080 npm run dev
The UI will listen on localhost:5173 and instantly show any frontend changes
you make. Backend changes require building everything from the top (daemon and installer).
Installer utils, getting a shell
Check ./scripts/install-dev.sh util --help
for useful utilities for transferring files, opening shells. The exact tools
available wildly depend on the device you're working on, and they are
usually documented the relevant device's page under Supported
Devices.
A lot of devices run a trimmed down version of Android and have ADB (Android
Debug Bridge) support. The USB-based installers (orbic-usb, pinephone,
uz801) use ADB to perform the installation.
You might want to install and use actual ADB to connect to the device, push files and generally poke around. The installer contains some tools to enable ADB:
adb kill-server

# Enables ADB on either of these devices
./scripts/install-dev.sh util tmobile-start-adb
./scripts/install-dev.sh orbic-usb

adb shell
Note though that we can't assist with any issues setting ADB up, especially not on Windows. There have been too many driver issues to make this the "golden path" for most users or contributors. There have been instances where people managed to brick their orbic devices using ADB on Windows.
Troubleshooting
You may need to turn off your VPN in order to load the frontend succesfully - even with local network sharing enabled, VPNs can interfere with the connection to the backend.
Specifically for WSL users:
-
The HyperV firewall also tends to interfere with the connection between frontend and backend. You can turn it off in your WSL settings.
-
WSL2 has a known compatibility issue which may prevent vite from detecting file system changes and therefore affects HMR (hot module replacement). If your hot reloading does not work, some have success using polling to detect changes. To do so, specify the following setting in vite.config.ts:
server: {
    watch: { usePolling: true }
}
Updating Rayhunter
Great news: if you've successfully installed Rayhunter, you already know how to update it! Our update process is identical to the installation process: simply repeat the steps for installing Rayhunter via a release or from source.
Configuration
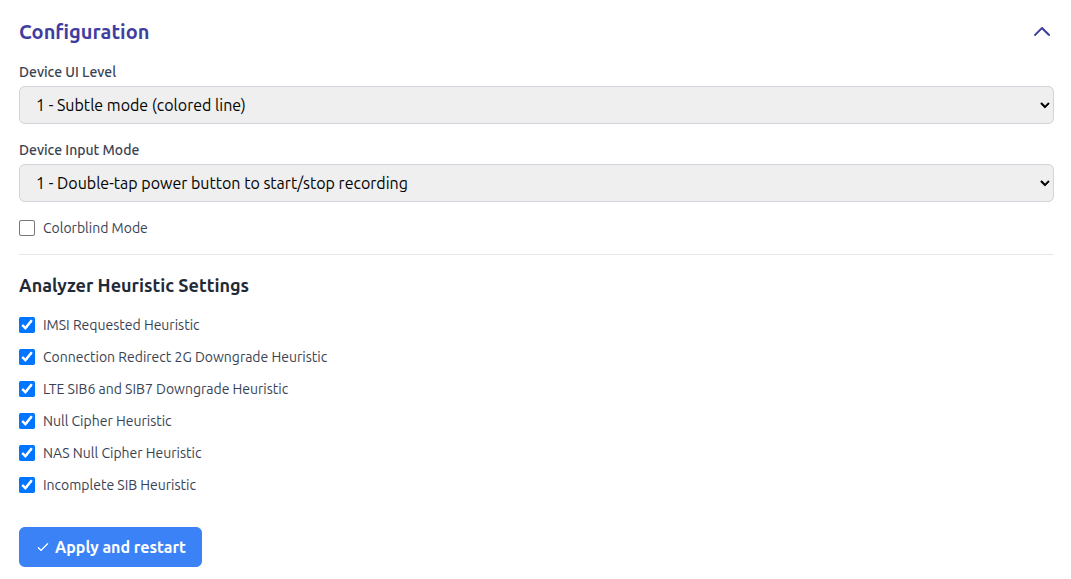
Rayhunter can be configured through web user interface or by editing /data/rayhunter/config.toml on the device.
Through web UI you can set:
- Device UI Level, which defines what Rayhunter shows on device's built-in screen. Device UI Level could be:
- Invisible mode: Rayhunter does not show anything on the built-in screen
- Subtle mode (colored line): Rayhunter shows green line if there are no warnings, red line if there are warnings (warnings could be checked through web UI) and white line if Rayhunter is not recording.
- Demo mode (orca gif), which shows image of orcas and colored line.
- EFF logo, which shows EFF logo and colored line.
- High visibility (full screen color): fills the entire screen with the status color (green for recording, red for warnings, white for paused).
- Device Input Mode, which defines behavior of built-in power button of the device. Device Input Mode could be:
- Disable button control: built-in power button of the device is not used by Rayhunter.
- Double-tap power button to start new recording: double clicking on a built-in power button of the device stops and immediately restarts the recording. This could be useful if Rayhunter's heuristics is triggered and you get the red line, and you want to "reset" the past warnings. Normally you can do that through web UI, but sometimes it is easier to double tap on power button.
- Colorblind Mode enables color blind mode (blue line is shown instead of green line, red line remains red). Please note that this does not cover all types of color blindness, but switching green to blue should be about enough to differentiate the color change for most types of color blindness.
- Automatically check for software updates enables periodic checks against the Rayhunter GitHub releases page. When a newer release is found, the web UI shows a notice and, if ntfy update notifications are enabled, a notification is sent.
- ntfy URL, which allows setting a ntfy URL to which notifications of new detections will be sent. The topic should be unique to your device, e.g.,
https://ntfy.sh/rayhunter_notifications_ba9di7ieorhttps://myserver.example.com/rayhunter_notifications_ba9di7ie. The ntfy Android and iOS apps can then be used to receive notifications. More information can be found in the ntfy docs. - Enabled Notification Types allows enabling or disabling the following types of notifications:
- Warnings, which will alert when a heuristic is triggered. Alerts will be sent at most once every five minutes.
- Low Battery, which will alert when the device's battery is low. Notifications may not be supported for all devices—you can check if your device is supported by looking at whether the battery level indicator is functioning on the System Information section of the Rayhunter UI.
- Software Updates, which will alert when a new Rayhunter release is available. Only triggers when Automatically check for software updates is enabled.
- With Analyzer Heuristic Settings you can switch on or off built-in Rayhunter heuristics. Some heuristics are experimental or can trigger a lot of false positive warnings in some networks (our tests have shown that some heuristics have different behavior in US or European networks). In that case you can decide whether you would like to have the heuristics that trigger a lot of false positives on or off. Please note that we are constantly improving and adding new heuristics, so a new release may reduce false positives in existing heuristics as well.
GPS
The GPS Settings allows you to attach GPS-based location history to every recording. Data is stored as a separate JSON file next to QMDL, and also inlined into the PCAP file as packet comment.
The modes are:
-
Disabled, the default option, disables this feature entirely.
-
Fixed, for hardcoding latitude (-90 to 90) and longitude (-180 to 180) for devices that don't move very often or at all. Every packet in the recording will have that location.
-
API Endpoint, enables the
POST /api/gpsendpoint so that third-party tools (i.e. your own scripts) can update location info continuously. Please refer to the API documentation for more info.
The GPS data is stored as a separate JSON file next to QMDL captures, and contains its own timestamps. These timestamps are meant to be compared during analysis with the packet timestamp so we know the time difference between the packet capture from the GPS capture, if there is any, since GPS data and packet data may come from two entirely separate devices.
WiFi Client Mode
On the Orbic, Moxee, UZ801, TMOHS1, and Wingtech, Rayhunter can connect the device to an existing WiFi network while keeping the hotspot running. This gives the device internet access for notifications and lets you reach the web UI from any device on that network.
- Enable WiFi turns WiFi client mode on or off. Disabling it does not erase saved credentials.
- Scan searches for nearby networks. Select one from the dropdown, or type an SSID manually.
- Password is required for WPA/WPA2 networks. The password is stored separately from
config.toml(inwpa_sta.confon the device) and is never exposed through the API. - DNS Servers lets you override the DNS servers used when connected. Defaults to
9.9.9.9and149.112.112.112(Quad9) if not set.
After saving, the connection status will show connecting, connected (with the assigned IP address), or failed (with an error message). If the connection fails, check that the SSID and password are correct and that the network is in range.
Crash Recovery
The WiFi kernel module (wlan.ko) can occasionally crash or unload, taking both the hotspot and client interfaces down with it. Rayhunter includes a watchdog that detects this and automatically reloads the module, restarts the hotspot, and reconnects to the configured network. During recovery the WiFi status will show recovering.
On the first detection of a crash, a diagnostic snapshot is saved to /data/rayhunter/crash-logs/ on the device. You can pull these logs with adb pull /data/rayhunter/crash-logs/ and inspect them to understand what went wrong. Each log contains:
- dmesg output (kernel messages). Look for backtraces,
BUG:/Oops:lines, orwlan/wcnsserrors. The kernel ring buffer is small and gets overwritten quickly, so crash details may already be gone if the crash happened well before detection. - /proc/modules snapshot. If
wlanis absent, the module fully unloaded. If present but interfaces are gone, the driver is stuck. - ip addr output confirming which network interfaces existed at snapshot time.
- ps output showing which WiFi-related processes (
hostapd,wpa_supplicant,wland) were still running.
If recovery fails after 5 attempts, the status will change to failed. A reboot of the device will reset WiFi.
WebDAV Upload
Rayhunter can automatically upload finished recordings to a WebDAV server. When a [webdav] section is present in config.toml, a background worker periodically scans the recording store and uploads any closed entry that is older than min_age_secs. Each eligible entry uploads two files: the raw .qmdl capture and its .ndjson analysis output. After a successful upload the entry is either marked as uploaded in the manifest (and skipped on subsequent polls), or deleted locally if delete_on_upload = true. With no [webdav] section, no upload worker runs.
WebDAV upload is currently configurable only by editing config.toml — there is no web UI control for it yet.
| Key | Required | Default | Description |
|---|---|---|---|
url | yes | — | WebDAV server base URL, e.g. https://example.com/remote.php/files/user/rayhunter/ |
username | no | — | HTTP Basic auth username |
password | no | — | HTTP Basic auth password |
upload_timeout_secs | no | 300 | Timeout (seconds) for each upload request |
poll_interval_secs | no | 3600 | How often (seconds) the worker scans for eligible entries |
min_age_secs | no | 86400 | Minimum age (seconds) an entry must have before it becomes eligible for upload |
delete_on_upload | no | false | Delete the entry locally after a successful upload |
Example:
[webdav]
url = "https://dav.example.com/rayhunter/"
username = "user"
password = "pass"
upload_timeout_secs = 300
poll_interval_secs = 3600
min_age_secs = 86400
delete_on_upload = false
A few notes on behavior:
- Auth: HTTP Basic. Supplying a
passwordwithout ausernameis rejected — the request is sent unauthenticated and a warning is logged. - Retries and overwrites: each entry's two files (
.qmdland.ndjson) must both upload successfully before the entry is marked as uploaded in the manifest. If one upload fails, the entry stays unmarked and both files are retried on the next poll — the one that previously succeeded will be overwritten on the server. Once an entry is marked as uploaded, Rayhunter will not upload it again. - Currently-recording entry: the active recording is never uploaded; only closed entries are eligible.
If you prefer editing config.toml file, you need to obtain a shell on your Orbic or TP-Link device and edit the file manually. You can view the default configuration file on GitHub.
Uninstalling
There is no automated uninstallation routine, so this page documents the routine for some devices.
Orbic
Run ./installer util orbic-shell --admin-password mypassword. Refer to the
installation instructions for how to find out the admin password.
Inside, run:
echo 3 > /usrdata/mode.cfg  # only relevant if you previously installed via ADB installer
rm -rf /data/rayhunter /etc/init.d/rayhunter_daemon /bin/rootshell
reboot
Your device is now Rayhunter-free, and should no longer be rooted.
TPLink
- Run
./installer util tplink-shellto obtain rootshell on the device. rm /data/rayhunter /etc/init.d/rayhunter_daemonupdate-rc.d rayhunter_daemon remove- (hardware revision v4.0+ only) In
Settings > NAT Settings > Port Triggersin TP-Link's admin UI, remove any leftover port triggers.
UZ801
- (Optional): Back up the qmdl folder with all of the captures:
adb pull /data/rayhunter/qmdl . - Run
adb shellto get a root shell on the device - Delete the /data/rayhunter folder:
rm -rf /data/rayhunter - Modify the initmifiservice.sh script to remove the rayhunter startup line:
mount -o remount,rw /system
busybox vi /system/bin/initmifiservice.sh
Then type 999G (shift+g), then type dd. Then press the colon key (:) and type wq. Finally, press Enter.
4. Lastly, run setprop persist.sys.usb.config rndis.
5. Type reboot to reboot the device.
Using Rayhunter
Once installed, Rayhunter will run automatically whenever your device is running. You'll see a green line on top of the device's display to indicate that it's running and recording. The line will turn yellow dots, orange dashes, or solid red once a potential IMSI catcher has been found, depending on the severity of the alert, until the device is rebooted or a new recording is started through the web UI.
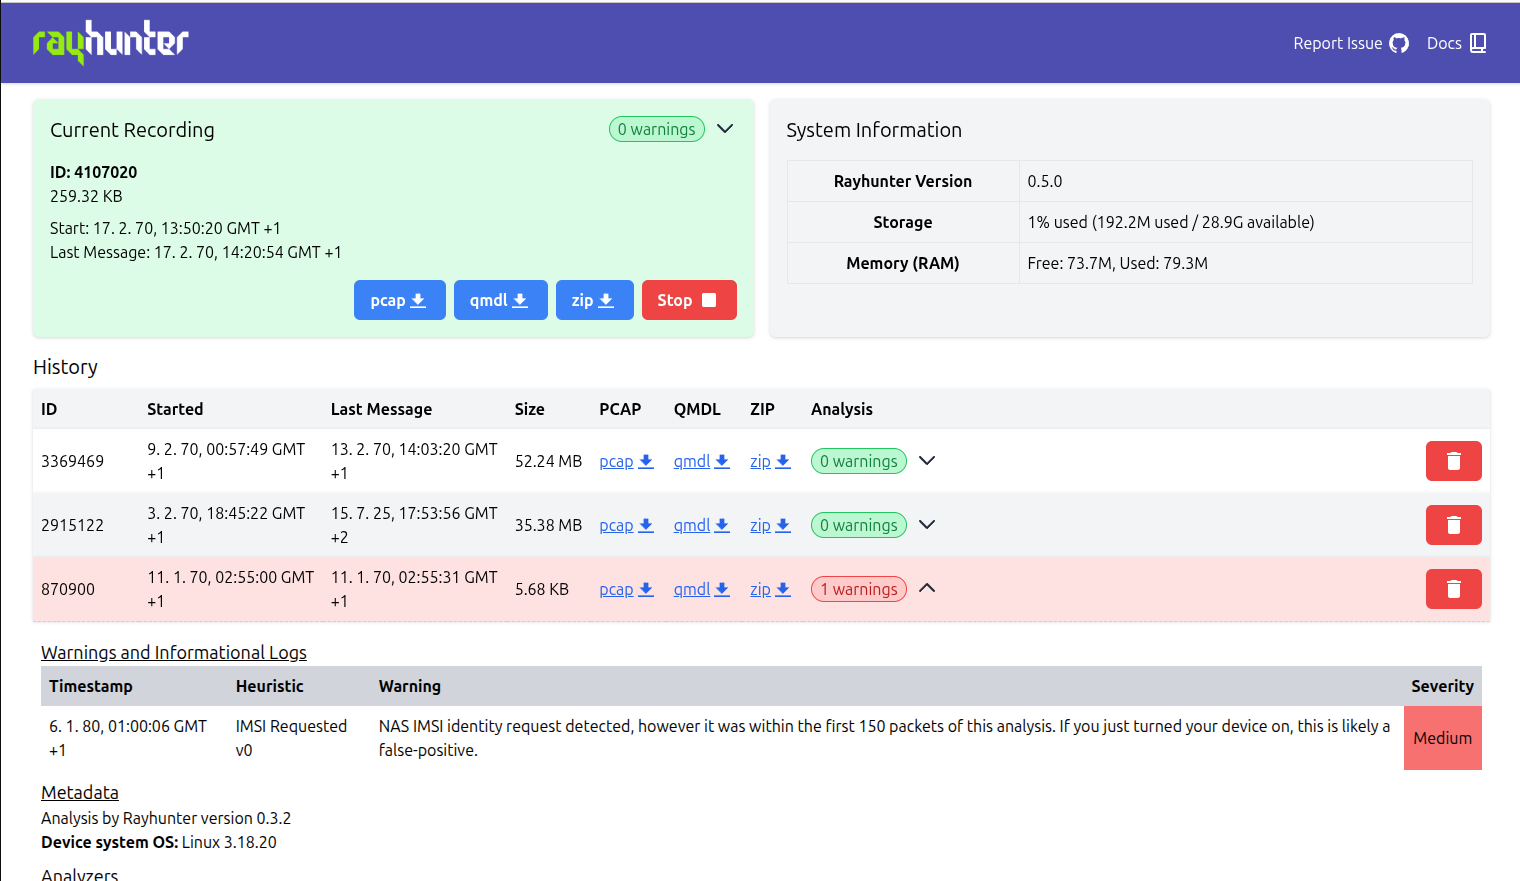
It also serves a web UI that provides some basic controls, such as being able to start/stop recordings, download captures, delete captures, and view heuristic analyses of captures.
The web UI
You can access this UI in one of two ways:
-
Connect over WiFi: Connect your phone/laptop to your device's WiFi network and visit http://192.168.1.1:8080 (orbic) or http://192.168.0.1:8080 (tplink).
Click past your browser warning you about the connection not being secure; Rayhunter doesn't have HTTPS yet.
On the Orbic, you can find the WiFi network password by going to the Orbic's menu > 2.4 GHz WIFI Info > Enter > find the 8-character password next to the lock 🔒 icon. On the TP-Link, you can find the WiFi network password by going to the TP-Link's menu > Advanced > Wireless > Basic Settings.
If WiFi client mode is enabled, you can also reach the web UI from any device on that network at
http://<device-ip>:8080. -
Connect over USB (Orbic): Connect your device to your laptop via USB. Run
adb forward tcp:8080 tcp:8080, then visit http://localhost:8080.- For this you will need to install the Android Debug Bridge (ADB) on your computer, you can copy the version that was downloaded inside the
releases/platform-tools/folder to somewhere else in your path or you can install it manually. - You can find instructions for doing so on your platform here, (don't worry about instructions for installing it on a phone/device yet).
- On MacOS, the easiest way to install ADB is with Homebrew: First install Homebrew, then run
brew install android-platform-tools.
- For this you will need to install the Android Debug Bridge (ADB) on your computer, you can copy the version that was downloaded inside the
-
Connect over USB (TP-Link): Plug in the TP-Link and use USB tethering to establish a network connection. ADB support can be enabled on the device, but the installer won't do it for you.
NOTE: When downloading recordings, "Insecure download blocked" warnings can safely be ignored - this is due to Rayhunter not using HTTPS.
Key shortcuts
As of Rayhunter version 0.3.3, you can start a new recording by double-tapping the power button. Any current recording will be stopped and a new recording will be started, resetting the red line as well. This feature is disabled by default since Rayhunter version 0.4.0 and needs to be enabled through configuration.
Heuristics
Rayhunter includes several analyzers to detect potential IMSI catcher activity. These can be enabled and disabled in your configuration file.
Available Analyzers
IMSI Requested (v3)
This analyzer tests whether the eNodeB sends an IMSI or IMEI Identity Request NAS message under suspicious .
Mobile networks primarily request IMSI or IMEI from a mobile device during initial network attachment or when the network cannot identify the mobile device by its temporary identification (TMSI - Temporary Mobile Subscriber Identity or GUTI - Globally Unique Temporary Identifier in 4G/5G terminology).
IMSI request therefore usually happens when you first turn the device on especially after it has been off for a long time. Another possibility is, that you reboot your mobile device and your temporary ID expired. Sometimes temporary identification can expire if you have been in an area where there is absolutely no connection to your service provider or after you left your device on an airplane mode and then reconnect to the network (especially being disconnected for a long time). IMSI could also be requested when you connect to a new network (for instance for roaming), when you swap she SIM card or when your device moves to a new Tracking Area or Location Area and the network can not map the temporary identification to your device. IMSI number can also be requested after core network reboot.
It should also be noted that the network periodically reassigns your device new temporary identification to enhance security and avoid tracking, but in that cases usually does not request IMSI.
During these events the phone will typically go on to authenticate that the network is legitimate and then establish service with the network it is connected to.
What we consider suspicious is the following chain of events:
- Phone connects to a new tower.
- Tower asks for phones identity (IMEI or IMSI.)
- Authentication does NOT happen.
- Tower requests phone to disconnect.
Looking for this chain of events is much less prone to false positives than naively looking for any time the IMSI/IMEI is sent. We do still sometimes get false positives when users are in an airplane that is coming in for a landing however. This is likely due to having been disconnected for a while and then being over towers that are not able to route to your home network, but we are still researching.
This is the attack used by commercial IMSI catchers used by law enforcement.
This heuristic will also alert you if any of the following happen:
- Identity is requested after authentication.
- Identity is requested without your phone connecting to the tower.
- Identity is requested and then authentication doesn't happen shortly thereafter.
This heuristic will also issue a notification every time your identity is sent to the network under non suspicious circumstances. This is for diagnostic purposes.
Connection Release/Redirected Carrier 2G Downgrade
This analyzer tests if a base station releases your device's connection and redirects your device to a 2G base station. This heuristic is useful, because some IMSI catchers may operate in a such way that they downgrade connection to 2G where they can intercept the communication (by performing man-in-the-middle attack).
LTE SIB6/7 Downgrade (v2)
This analyzer tests if LTE base station is broadcasting a SIB type 6 and 7 messages which include 2G/3G frequencies with higher priorities.
SIB (System Information Block) Type 6 and 7 are specific types of broadcast messages sent by the base station (eNodeB in 4G networks) to mobile devices. They contain essential radio-related configuration parameters to help mobile device perform cell reselection.
This attack exploits the fact that SIB broadcast messages are not encrypted or authenticated. This allows them to pretend to be a legitimate cell by broadcasting fake system information in order to force mobile devices to downgrade from more secure 4G (LTE) to less secure 2G (GSM) network and then steal IMSI and/or perform man-in-the-middle attack. That is why this is also called a downgrade attack.
SIB6 is used for cell reselection to CDMA2000 systems which are not supported by many modern mobile phones, and SIB7 Provides the mobile device with information to perform cell reselection to GSM/EDGE networks. Therefore SIB6 messages are quite rare, while malformed SIB7 messages are much more frequent in practice.
This heuristic is useful even in countries where 2g is still prevalent. A well behaved tower should always advertise its other 4g neighbors at a higher priority than 2g/3g neighbors. (Older versions of this heuristic were prone to false positives.)
Null Cipher
This analyzer tests whether the cell suggests using a null cipher (EEA0) in the RRC layer. That means that encryption between your mobile device and base station is turned off.
Normally this should never happen, because null cipher is used almost exclusively for testing and debugging in labs or in controlled environments. Sometimes null cipher is used if encryption negotiation fails or isn’t supported (however in most networks this should not be the case). Also, some regulations allow unencrypted communications in specific emergency cases.
The general rule is that null cipher should never be used in commercial deployments, except in very controlled conditions (e.g., test labs) or in a very specific regulatory-approved use cases.
On the other hand, IMSI catchers often use null cipher to avoid setting up secure contexts (because they lack valid keys) and/or to trick mobile device into using unencrypted links (which makes eavesdropping easier).
NAS Null Cipher
This analyzer tests whether the security mode command at the NAS layer suggests using a null cipher (EEA0). This would usually only happen after a mobile device has successfully authenticated with the MME (Mobility Management Entity - core network component that handles signaling and control) but still it shouldn't happen at all. This could be indicative of an attack though using SS7 (Signaling System 7 - a set of telecommunication protocols used to set up and manage calls and other services) to get key material from the HLR (Home Location Register - a database in mobile telecommunications networks that stores subscriber information) of the mobile phone for a successful authentication.
It could also indicate an IMSI catcher which is connected to the mobile network MME and HLR through cooperation between government and telecom provider. Or it could be a false positive if the telecom provider is intending to use null ciphers (if encryption is illegal in some country, or they have some misconfiguration of the network), however this should be very rare case.
Incomplete SIB
This analyzer tests whether the SIB1 message contains a complete SIB chain (SIB3, SIB5, etc.). A legitimate SIB1 message should contain timing information for at least 2 additional SIBs (SIB3, 4, and 5 being the most common) but a fake base station will often not bother to send additional SIBs beyond 1 and 2 (i. e. some IMSI catchers send just SIB1 and one additional SIB).
On its own this might just be a misconfigured base station (though we have only seen it in the wild under suspicious circumstances) but combined with other heuristics such as IMSI Requested detection it should be considered as a strong indicator of malicious activity.
Diagnostic Information
This analyzer displays some diagnostic information about when your device connects and disconnects from certain towers. It is helpful for analysis of suspicious PCAPs. The informational warnings in here can safely be ignored until there is a low, medium, or high severity warning.
Test Analyzer
This analyzer is great for testing if your Rayhunter installation works. It will alert every time a new tower is seen (specifically every time a tower broadcasts a SIB1 message.) It is designed to be very noisy so we do not recommend leaving it on but if this alerts it means your Rayhunter device is working!
Re-analyzing recordings
Every once in a while, Rayhunter refines its heuristics to detect more kinds of suspicious behavior, and to reduce noise from incorrect alerts.
This means that your old green recordings may actually contain data that is now deemed suspicious, and also old red recordings may become green.
You can re-analyze any old recording inside of Rayhunter by clicking on "N warnings" to expand details, then clicking the "re-analyze" button.
Analyzing recordings on Desktop
If you have a PCAP or QMDL file but no rayhunter, you can analyze it on desktop
using the rayhunter-check CLI tool. That tool contains the same heuristics as
Rayhunter and will also work on traffic data captured with other tools, such as
QCSuper.
Since 0.6.1, rayhunter-check is included in the release zipfile.
You can build rayhunter-check from source with the following command:
cargo build --bin rayhunter-check
Usage
rayhunter-check [OPTIONS] --path <PATH>

Options:
  -p, --path <PATH>   Path to the PCAP, or QMDL file. If given a directory will
                        recursively scan all pcap, qmdl, and subdirectories
  -P, --pcapify       Turn QMDL file into PCAP
      --show-skipped  Show skipped messages
  -q, --quiet         Print only warnings
  -d, --debug         Print debug info
  -h, --help          Print help
  -V, --version       Print version
Examples
rayhunter-check -p ~/Downloads/myfile.qmdl
rayhunter-check -p ~/Downloads/myfile.pcap
rayhunter-check -p ~/Downloads #Check all files in downloads
rayhunter-check -d -p ~/Downloads/myfile.qmdl #run in debug mode
How we analyze a capture
Teams of highly trained squirrels. Video coming soon!
Supported devices
Be sure to check your location's supported frequencies against a device page before obtaining a device.
1. Recommended devices
These devices have been extensively tested by the core developers and are widely used. Use one of these devices if you can.
| Device | Recommended region |
|---|---|
| Orbic RC400L Sometimes also branded Kajeet RC400L | Americas |
| TP-Link M7350 | Africa, Europe, Middle East |
The TP-Link M7350 also works in the Americas but is usually more expensive.
 Derivative work of this file by Maximillian Dörrbecker licensed CC BY-SA 2.5
2. Functional devices
Rayhunter is confirmed to work on these devices.
| Device | Recommended region |
|---|---|
| Wingtech CT2MHS01 | Americas |
| Tmobile TMOHS1 | Americas |
| TP-Link M7310 | Africa, Europe, Middle East |
| PinePhone and PinePhone Pro | Global |
| FY UZ801 | Asia, Europe |
| Moxee hotspot | Americas |
Adding new devices
Rayhunter was built and tested primarily on the Orbic RC400L mobile hotspot, but the community has been working hard at adding support for other devices. Theoretically, if a device runs a Qualcomm modem and exposes a /dev/diag interface, Rayhunter may work on it.
If you have a device in mind which you'd like Rayhunter to support, please read the porting guide and open a discussion on our Github!
Porting to new devices
When will we consider new devices?
Rayhunter is already officially supported on several devices, and people are often interested in adding support for hardware they already own. Here's a non-exhaustive list of situations where we'd consider adding a new Tier 2 device:
- The device is significantly cheaper or more available in a specific region than any device we already support.
- The device supports 5G and costs less than 100 USD.
- You're willing to commit to supporting this device and handling bug reports.
- The device has support for all cellular bands and can work in any country.
We want to avoid a situation where the list of supported devices keeps growing but the number of recurring contributors and maintainers stays the same.
That said, you can always maintain a fork, or install Rayhunter manually without writing an installer. You can promote this work in the GitHub discussions area, where most new hardware investigations happen.
Please don't open issues about supporting a new device, use GitHub discussions instead. Most hardware investigations end up being abandoned, and the amount of issues we'd have to triage would be too much.
Prerequisites: root shell, and /dev/diag
Rayhunter is a Linux binary that reads traffic from the Qualcomm diagnostic interface, which requires root. If either of those isn't available, Rayhunter can't work. Everything else (displays, buttons) is secondary, and we can deal with it later.
In the devices we currently support /dev/diag is the interface for Qualcomm diagnostics and devices with this will be easiest to support. Newer Qualcomm modems expose the diagnostic interface over a USB gadget which is something we are working on support for, but do not currently have. Thus devices with the former diagnostic interface will be easier to port Rayhunter to.
You can check ahead of purchase whether /dev/diag is available by ensuring the device has a Qualcomm MDM* chip. Other Qualcomm LTE chips might work but we haven't encountered one yet. Typically you will be able to get this information from fcc.report, where either the chip is written down in some PDF or at least plainly visible in one of the teardown photos. Sometimes this information can also be found through teardown videos on YouTube. If you find that chip, there's a good chance (but no guarantee) /dev/diag is available.
Any vendor other than Qualcomm (Mediatek, Rockchip, ...) is unlikely to work. Quectel sometimes repackages Qualcomm chips into larger systems and might work. Huawei devices won't work, as they use their own chips.
Getting a root shell varies from device to device. Check the GitHub discussions for prior art, and look through the installer source in installer/src/ for inspiration. These approaches are common:
- Connecting with
adb shell. - If
adb shelldoesn't work, sending a special USB serial command might enable it. - Sometimes there's an unpatched CVE that can be used to launch
telnetdas root (search "device name CVE", the website opencve.io is particularly easy to use).
Once you have a root shell, check that /dev/diag exists.
Installing Rayhunter manually
The Rayhunter installation consists of just two components: the rayhunter-daemon binary, and the config file (config.toml).
Typically the layout on the filesystem will look like this:
/data/rayhunter/rayhunter-daemon
/data/rayhunter/config.toml
/data/rayhunter/qmdl/
Then, ./rayhunter-daemon config.toml can be started manually.
You can refer to Installing from source for how to obtain the rayhunter-daemon binary.
We're assuming that your device is ARMv7, i.e. 32-bit ARM (armv7-unknown-linux-musleabihf). If that's not the case, you can still build the daemon but you'll need to figure out the correct target triple on your own.
You can copy the daemon and config files to the device using netcat or adb push. They don't have to be in /data/rayhunter/, this is just convention. If you use a different path, be sure to update the qmdl_store_path setting in config.toml.
The device setting in config.toml must match one of the lowercase variant names from the Device enum (e.g. "orbic", "tplink"). This controls which display driver is used.
To bring the daemon up without /dev/diag (for instance, to test the display and web UI before the hardware path works), see Running the daemon on your PC.
Autostart
To make Rayhunter start on boot, you'll need an init script. The existing installers use the template at dist/scripts/rayhunter_daemon, which has a #RAYHUNTER-PRESTART placeholder that gets replaced with device-specific setup commands (e.g. killing a vendor UI process, mounting an SD card). Look at how the existing installers handle this in their install() functions.
Display support
The device setting mentioned above also controls which display driver is loaded (see Device enum in lib/src/lib.rs). Unless your device is a variant of an existing device, you'll want to add a new variant to the Device enum and write a corresponding display module in daemon/src/display/.
You can play around with the existing values of the device setting to see which one ends up rendering on your device's display. Most likely your device has a display similar enough to an existing one, and the display module for that device (e.g. daemon/src/display/orbic.rs, daemon/src/display/tplink.rs) can be used as a starting point.
If your device has LEDs instead of a display, take a look at daemon/src/display/uz801.rs which controls LEDs via sysfs.
Button support
Rayhunter can use the power button to restart recordings via a double-tap gesture. The implementation is in daemon/src/key_input.rs. It currently has no structure for device-specific implementations, as all devices we support expose the same input event interface.
The key_input_mode setting in config.toml controls this feature (0 = disabled, 1 = double-tap power button to start/stop recordings).
Writing the installer, and contributing official support
At this point you'll want to have figured out how to automate the entire installation in principle, and how to make it as repeatable as possible. A proof-of-concept of this in bash or another language is also a welcome contribution (to be posted on GitHub discussions, not as a PR).
Writing the installer means adding a new variant to the Command enum in installer/src/lib.rs and implementing the install logic in a new module under installer/src/. Each subcommand maps to a device-specific entry point function (e.g. tplink::main_tplink, orbic_network::install).
The installer gets the daemon binary path from env!("FILE_RAYHUNTER_DAEMON"), which is set at build time. Config installation is handled by the shared install_config() helper in the connection module, which writes the config file with the correct device name.
You must also add a shell utility subcommand under installer util (the UtilSubCommand enum in installer/src/lib.rs), e.g. installer util tplink-shell, installer util orbic-shell. This is required -- without it, users and developers have no way to interactively debug the device. Depending on connectivity, this might be a telnet session, an ADB shell, or a serial connection. Other utilities (file transfer helpers, etc.) are optional but encouraged. See the existing UtilSubCommand variants for examples.
Please reuse existing utilities wherever possible. Take a look at installer/src/tplink.rs and installer/src/orbic_network.rs for inspiration. But the structures there are still evolving, and we'll happily guide you during code review.
Orbic/Kajeet RC400L
The Orbic RC400L is an inexpensive LTE modem primarily designed for the US market, and the original device for which Rayhunter is developed.
It is also sometimes sold under the brand Kajeet RC400L. This is the exact same hardware and can be treated the same.
You can buy an Orbic using bezos bucks, or on eBay. You should not pay more than 30 USD for such a device (without shipping).
Please check whether the Orbic works in your country, and whether the Orbic RC400L supports the right frequency bands for your purpose before buying.
Supported Bands
| Frequency | Band |
|---|---|
| 5G (wideband,midband,nationwide) | n260/n261, n77, n2/5/48/66 |
| 4G | 2/4/5/12/13/48/66 |
| Global & Roaming | n257/n78 |
| Wifi 2.4Ghz | b/g/n |
| Wifi 5Ghz | a/ac/ax |
| Wifi 6 | 🮱 |
WiFi client mode
The Orbic's QCA6174 radio supports running the hotspot and connecting to an external WiFi network at the same time. See WiFi Client Mode for setup.
Two kinds of installers
The orbic's installation routine underwent many different changes:
- The ADB-based shellscript prior to version 0.3.0
- The Rust-based, ADB-based installer since version 0.3.0
- Then, starting with 0.6.0, an alternative installer
./installer orbic-networkthat is supposed to work more reliably, can run over the Orbic's WiFi connection and without the need to manually install USB drivers on Windows. - Starting with 0.8.0,
orbic-networkhas been renamed toorbic, and the old./installer orbicis now called./installer orbic-usb.
It's possible that many tutorials out there still refer to some of the old installation routines.
Installing
To get started, follow the release installation guide. Then run the installer with the following command:
# For Orbic:
./installer orbic --admin-password 'mypassword'

# For Kajeet/Smartspot:
./installer orbic --admin-password '$m@rt$p0tc0nf!g'

# Note: the arguments --admin-username 'myusername' and --admin-ip 'mydeviceip'
#       may be required if different from the default.

# Or install over USB if you want ADB and a root shell (not recommended for most users)
./installer orbic-usb
- The password is the one used to log in to the device's admin menu. You can reset the password by pressing the button under the back case until the unit restarts.
- Note: If you have changed the device username, password, or IP address from their default values, these must be provided as arguments to the installer command above.
- On Verizon Orbic, the default password is the WiFi password.
- On Kajeet/Smartspot devices, the default password is
$m@rt$p0tc0nf!g
The Rayhunter UI will be available at http://192.168.1.1:8080.
Obtaining a shell
After running the installer, there will not be a root shell and ADB will not be enabled. Instead, you can use:
./installer util orbic-shell
If you are using an installer prior to 0.7.0 or orbic-usb explicitly, you can
obtain a root shell by running adb shell or ./installer util shell. Then,
inside of that shell you can run /bin/rootshell to obtain "fakeroot."
TP-Link M7350
Supported in Rayhunter since version 0.3.0.
The TP-Link M7350 supports many more frequency bands than Orbic and therefore works in Europe and also in some Asian and African countries.
Supported Bands
| Technology | Bands |
|---|---|
| 4G LTE | B1/B3/B7/B8/B20 (2100/1800/2600/900/800 MHz) |
| 3G | B1/B8 (2100/900 MHz) |
| 2G | 850/900/1800/1900 MHz |
Source: TP-Link Official Product Page
Hardware versions
The TP-Link comes in many different hardware versions. Support for installation varies:
1.0, Confirmed working. Successfully tested by a user with the Windows installer (rayhunter-v0.10.2-windows-x86_64). Ensure the SD card is formatted as FAT32 before installation.2.0: Not supported, devs are not able to obtain a device3.0,3.2,5.0,5.2,7.0,8.0: Tested, no known issues since 0.3.0.6.2: One user reported it is working, not tested4.0: Manual firmware downgrade required (issue)9.0: Working since 0.3.2.
TP-Link versions newer than 3.0 have cyan packaging and a color display. Version 3.0 has a one-bit display and white packaging.
You can find the exact hardware version of each device under the battery or next to the barcode on the outer packaging, for example V3.0 or V5.2.
When filing bug reports, particularly with the installer, please always specify the exact hardware version.
You can get your TP-Link M7350 from:
- First check for used offers on local sites, sometimes it's much cheaper there.
- Geizhals price comparison.
- Ebay.
- Can also be found sold as the 'Vodafone Pocket Wifi 5' in Australia
Installing
To get started, follow the release installation guide. Then run the installer with the following command:
./installer tplink
The Rayhunter UI will be available at http://192.168.0.1:8080.
Obtaining a shell
You can obtain a root shell with the following command:
./installer util tplink-shell
Display states
If your device has a color display, Rayhunter will show the same red/green/white line at the top of the display as it does on Orbic, each color meaning "warning"/"recording"/"paused" respectively. See Using Rayhunter.
If your device has a one-bit (black-and-white) display, Rayhunter will instead show an emoji to indicate status:
!means "warning (potential IMSI catcher)":)(smiling) means "recording":(face with no mouth) means "paused"
Power-saving mode/sleep
By default the device will go to sleep after N minutes of no devices being connected. In that mode it will also turn off connections to cell phone towers. In order for Rayhunter to record continuously, you have to turn off this sleep mode in TP-Link's admin panel (go to Advanced - Power Saving) or keep e.g. your phone connected on the TP-Link's WiFi.
Port triggers
On hardware revisions starting with v4.0, the installer will modify settings to
add two port triggers. You can look at Settings > NAT Settings > Port Triggers in TP-Link's admin UI to see them.
- One port trigger "rayhunter-root" to launch the telnet shell. This is only needed for installation, and can be removed after upgrade. You can reinstall it using
./installer util tplink-shell. - One port trigger "rayhunter-daemon" to auto-start Rayhunter on boot. If you remove this, Rayhunter will have to be started manually from shell.
Other links
For more information on the device and instructions on how to install Rayhunter without an installer (i.e. manually), please see rayhunter-tplink-m7350
TP-Link M7310
Supported in Rayhunter since version 0.4.0.
The TP-Link M7310 works similarly to the M7350 and is
essentially an older, more expensive version of it. The installation procedure
is identical, ./installer tplink.
Hardware version v1.0 has been successfully tested, later versions may work as well.
Tmobile TMOHS1
The Tmobile TMOHS1 hotspot is a Qualcomm mdm9607-based device with many similarities to the Wingtech CT2MHS01 hotspot. The TMOHS1 has no screen, only 5 LEDs, two of which are RGB.
Hardware
Cheap used versions of the device can be found easily on Ebay, and also from these sellers:
- https://www.amazon.com/T-Mobile-TMOHS1-Portable-Hotspot-Connect/dp/B0CD9MX232
- https://www.walmart.com/ip/T-Mobile-TMOHS1-Portable-Internet-4G-LTE-WIFI-Hotspot/3453542421
- https://www.metrobyt-mobile.com/hotspot-iot-connected-devices/t-mobile-hotspot
Rayhunter has been tested on:
WT_INNER_VERSION=SW_Q89527AA1_V045_M11_TMO_USR_MP
WT_PRODUCTION_VERSION=TMOHS1_00.05.20
WT_HARDWARE_VERSION=89527_1_11
Please consider sharing the contents of your device's /etc/wt_version file here.
Supported bands
The TMOHS1 is primarily an ITU Region 2 device, although Bands 5 (CLR) and 41 (BRS) may be suitable for roaming in Region 3.
According to FCC ID 2APXW-TMOHS1 Test Report No. I20Z61602-WMD02 (part 1, part 2), the TMOHS1 supports the following LTE bands:
| Band | Frequency |
|---|---|
| 2 | 1900 MHz (PCS) |
| 4 | 1700 MHz (AWS-1) |
| 5 | 850 MHz (CLR) |
| 12 | 700 MHz (LSMH) |
| 25 | 1900 MHz (E-PCS) |
| 26 | 850 MHz (E-CLR) |
| 41 | 2500 MHz (BRS) |
| 66 | 1700 MHz (E-AWS) |
| 71 | 600 MHz (USDD) |
WiFi client mode
The TMOHS1 supports WiFi client mode, allowing Rayhunter to connect to an existing WiFi network while keeping the hotspot running. See WiFi Client Mode for setup.
Installing
Connect to the TMOHS1's network over WiFi or USB tethering.
The device will not accept web requests until after the default password is changed. If you have not previously logged in, log in using the default password printed under the battery and change the admin password.
Then run the installer:
./installer tmobile --admin-password Admin0123! # replace with your own password
LED modes
| Rayhunter state | LED indicator |
|---|---|
| Recording | Signal LED slowly blinks blue. |
| Paused | WiFi LED blinks white. |
| Warning Detected | Signal LED slowly blinks red. |
Wi-Fi auto-shutdown
By default the TMOHS1 turns off its Wi-Fi access point after 10 minutes with no connected clients. Rayhunter keeps recording on the device in the background, but once the access point is down you can't reach the web UI, download captures, or see new warnings until you power cycle the hotspot.
The TMOHS1's native admin UI lets you change this:
- Connect to the TMOHS1's Wi-Fi (or USB tether).
- In a browser open
http://192.168.0.1/and log in with the admin password. - Go to Settings → Sleep → Wi-Fi Standby and pick Always on.
- Click Apply.
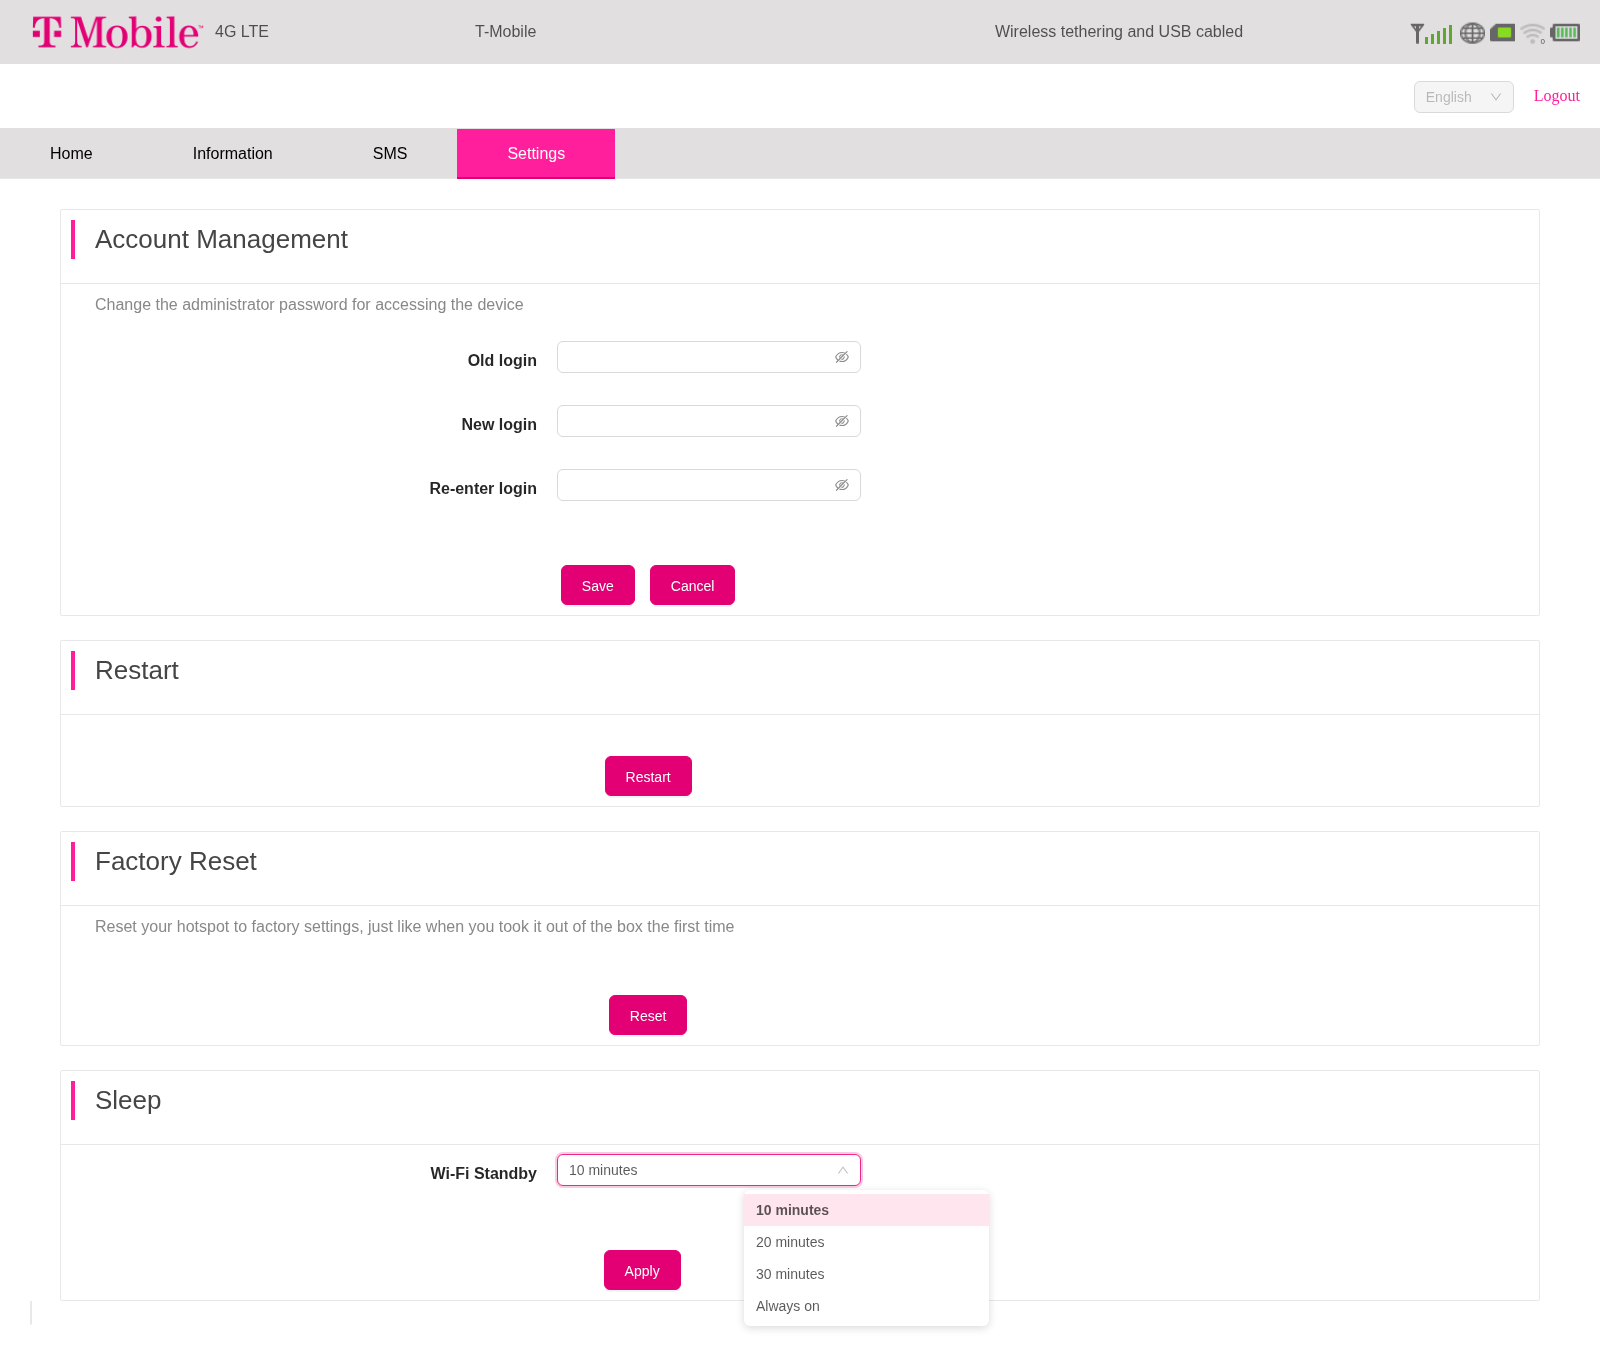
Keeping Wi-Fi always on uses more battery. If you only monitor Rayhunter through the device's LEDs and don't need remote access, the default 10-minute timer is fine.
Obtaining a shell
Even when rayhunter is running, for security reasons the TMOHS1 will not have telnet or adb enabled during normal operation.
Use either command below to enable telnet or adb access:
./installer util tmobile-start-telnet --admin-password Admin0123!
telnet 192.168.0.1
./installer util tmobile-start-adb --admin-password Admin0123!
adb shell
UZ801
The UZ801 is a 4G/LTE USB modem which is built on top of a Qualcomm Snapdragon 410 (MSM8916, with MDM8916 modem.) It does not have a screen, but it does have LEDs which can be used to signal the same status as the green/red bar on the Orbic hotspot. It uses a custom Android-based firmware with limited coreutils. More information about this device can be found here
It is worth noting that even though the Snapdragon 410 is a quad-core SoC, the CPU has only 2 of the cores enabled on the stock Android-based firmware, probably to avoid overheating as they did not exactly engineer any cooling solution. Regardless, even with 2 disabled cores there is plenty of compute overhead. There are 384MB of RAM on the SoC, and 4GB of eMMC in the form of an SK Hynix NAND flash chip located external to the SoC.
Rayhunter has been tested on UZ801 devices with firmware supporting USB debugging backdoor access. It is not certain whether all of the sticks that use this board will be compatible with the automated installer, or even with any alternative manual installation method. Please consider sharing your device's firmware version and hardware information here to help improve compatibility.
Where to purchase
There are several option to purchase this device:
- AliExpress:
- eBay:
- Amazon:
Supported bands
The UZ801 supports various LTE bands depending on the specific hardware revision and carrier customization. Check your device specifications for the exact band support.
The most frequent bands found on these devices are LTE bands 1/3/5/8/20. In the US, this means that Verizon's band 5 towers are the only towers that this device could communicate with in its normal usage as an LTE modem. Research on whether Qualcomm diagnostic tools can be used to write new band support into the NVRAM is pending.
Installing
With the device fully booted (i.e. beaming a WiFi network, blue LED, etc.) and plugged into the computer that is performing the installation, run:
./installer uz801
Note: The default IP for UZ801 is typically 192.168.100.1; if yours differs, use the --admin-ip argument to specify it.
WiFi client mode
The UZ801's WCN36xx (PRONTO) radio supports concurrent AP+STA mode. The daemon has backend support for WiFi client mode on the UZ801, but this has not yet been successfully exercised end-to-end and the web UI currently does not expose the configuration surface on this device. Treat UZ801 WiFi client mode as not yet supported. See WiFi Client Mode for the intended setup on supported devices.
The interface creation method differs from the Orbic (which uses iw): the UZ801 creates a P2P_CLIENT virtual interface via nl80211 and converts it to a managed STATION interface. This is handled by the daemon when the feature is enabled.
LED modes
| Rayhunter state | LED indicator |
|---|---|
| Recording | Green LED solid on |
| Paused | WiFi (blue) LED solid on |
| Warning Detected | Red LED solid on |
Note: Unlike the TMOHS1, the UZ801 uses solid LED indicators instead of blinking patterns.
Obtaining a shell
The UZ801 supports ADB access after the USB debugging backdoor is activated.
adb shell
Device-specific notes
The UZ801 uses a unique installation process that activates a hidden USB debugging backdoor.
The installation process works as follows:
- Activates the USB debugging backdoor via HTTP AJAX request
- Waits for device reboot and ADB availability
- Uses ADB to install rayhunter files and modify the startup script
- Launches rayhunter daemon automatically
- The UZ801 does not symlink busybox for some core system utils, for some reason. Please use
busybox <utility_name>, e.g.busybox df -h. - USB debugging must be activated via the web backdoor before ADB access is possible (this is required only once.) The installer does this already.
- The device uses
/system/bin/initmifiservice.shas the main startup script.
Wingtech CT2MHS01
Supported in Rayhunter since version 0.4.0.
The Wingtech CT2MHS01 hotspot is a Qualcomm mdm9650-based device with a screen available for US$15-35. This device is often used as a base platform for white labeled versions like the T-Mobile TMOHS1. AT&T branded versions of the hotspot seem to be the most abundant.
Supported bands
There are likely variants of the device for all three ITU regions.
According to FCC ID 2APXW-CT2MHS01 Test Report No. I20N02441-RF-LTE, the ITU Region 2 American version of the device supports the following LTE bands:
| Band | Frequency |
|---|---|
| 2 | 1900 MHz (PCS) |
| 5 | 850 MHz (CLR) |
| 12 | 700 MHz (LSMH) |
| 14 | 700 MHz (USMH) |
| 30 | 2300 MHz (WCS) |
| 66 | 1700 MHz (E-AWS) |
Note that Band 5 (850 MHz, CLR) is suitable for roaming in ITU regions 2 and 3.
Hardware
Wingtechs are abundant on ebay and can also be found on Amazon:
- https://www.ebay.com/itm/135205906535
- https://www.ebay.com/itm/126987839936
- https://www.ebay.com/itm/127147132518
- https://www.amazon.com/AT-Turbo-Hotspot-256-Black/dp/B09YWLXVWT
WiFi client mode
The Wingtech supports WiFi client mode, allowing Rayhunter to connect to an existing WiFi network while keeping the hotspot running. See WiFi Client Mode for setup.
Installing
Connect to the Wingtech's network over WiFi or USB tethering, then run the installer:
./installer wingtech --admin-password 12345678 # replace with your own password
Obtaining a shell
Even when Rayhunter is running, for security reasons the Wingtech will not have telnet or adb enabled during normal operation.
Use either command below to enable telnet or adb access:
./installer util wingtech-start-telnet --admin-password 12345678
telnet 192.168.1.1
./installer util wingtech-start-adb --admin-password 12345678
adb shell
Wi-Fi auto-shutdown
By default the CT2MHS01 turns off its Wi-Fi access point after the configured sleep timer (default 10 minutes) with no connected clients. Rayhunter keeps recording on the device in the background, but once the access point is down you can't reach the web UI, download captures, or see new warnings until you power cycle the hotspot.
The CT2MHS01's native admin UI lets you change this:
- Connect to the Wingtech's Wi-Fi (or USB tether).
- In a browser open
http://192.168.1.1/and log in with the admin password. - Go to Settings → Sleep → Wi-Fi Standby and pick Always on.
- Click Save.
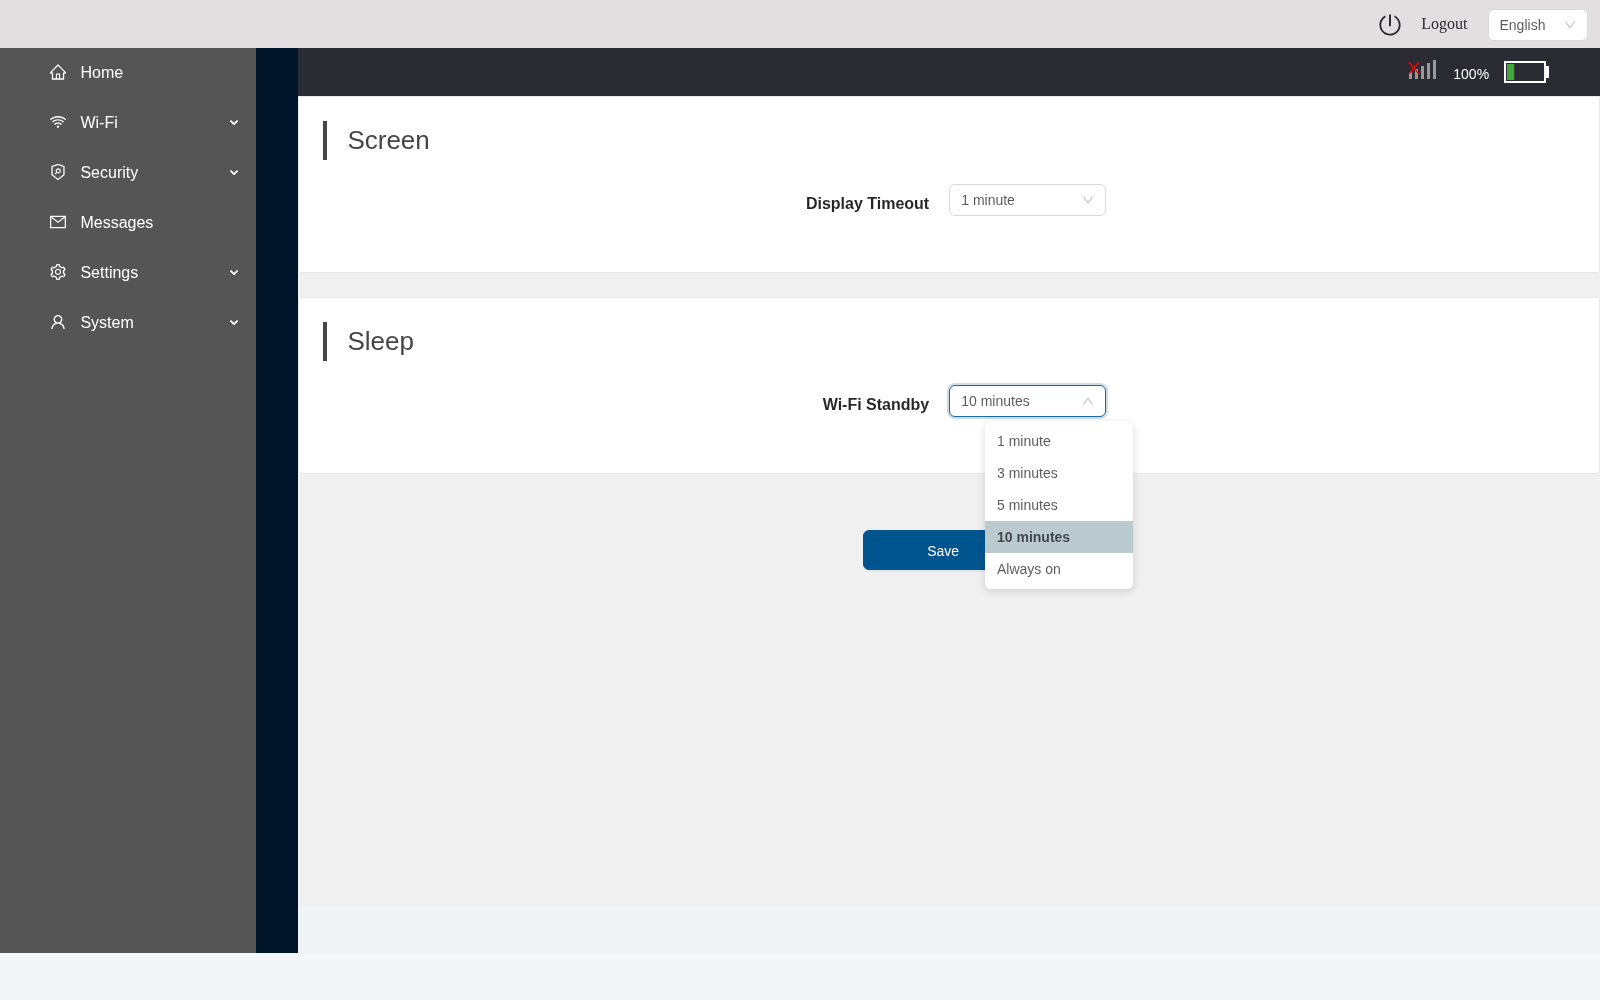
Keeping Wi-Fi always on uses more battery. If you primarily monitor Rayhunter through the device's screen and don't need remote access, leave the timer at its default.
Developing
The device has a framebuffer-driven screen at /dev/fb0 that behaves
similarly to the Orbic RC400L, although the userspace program
displaygui refreshes the screen significantly more often than on the
Orbic. This causes the green line on the screen to subtly flicker and
only be displayed during some frames. Subsequent work to fully control
the display without removing the OEM interface is desired.
Rayhunter has been tested on:
WT_INNER_VERSION=SW_Q89323AA1_V057_M10_CRICKET_USR_MP
WT_PRODUCTION_VERSION=CT2MHS01_0.04.55
WT_HARDWARE_VERSION=89323_1_20
Please consider sharing the contents of your device's /etc/wt_version file here.
Troubleshooting
My hotspot won't turn on after rebooting when installing over WiFi
Reinsert the battery and turn the device back on, Rayhunter should be installed and running. Sometimes the Wingtech hotspot gets stuck off and ignores the power button after a reboot until the battery is reseated.
You do not need to run the installer again.
You'll likely see the following messages, where the installer is stuck at Testing rayhunter ... .
Starting telnet ... ok
Connecting via telnet to 192.168.1.1 ... ok
Sending file /data/rayhunter/config.toml ... ok
Sending file /data/rayhunter/rayhunter-daemon ... ok
Sending file /etc/init.d/rayhunter_daemon ... ok
Rebooting device and waiting 30 seconds for it to start up.
Testing rayhunter ...
If you eventually see:
Testing rayhunter ...
Failed to install rayhunter on the Wingtech CT2MHS01

Caused by:
    0: error sending request for url (http://192.168.1.1:8080/index.html)
    1: client error (Connect)
    2: tcp connect error: Network is unreachable (os error 101)
    3: Network is unreachable (os error 101)
Make sure your computer is connected to the hotspot's WiFi network.
PinePhone and PinePhone Pro
The PinePhone and PinePhone Pro both use a Qualcomm mdm9607 modem as part of their Quectel EG25-G LTE module. The EG25-G has global LTE band support and contains a GNSS positioning module. Rayhunter does not currently make direct use of GNSS.
The modem is fully capable of running Rayhunter, but lacks both a screen and a network connection. The modem exposes an AT interface that can enable adb.
Hardware
Supported bands
| Band | Frequency |
|---|---|
| 1 | 2100 MHz (IMT) |
| 2 | 1900 MHz (PCS) |
| 3 | 1800 MHz (DCS) |
| 4 | 1700 MHz (AWS-1) |
| 5 | 850 MHz (CLR) |
| 7 | 2600 MHz (IMT-E) |
| 8 | 900 MHz (E-GSM) |
| 12 | 700 MHz (LSMH) |
| 13 | 700 MHz (USMH) |
| 18 | 850 MHz (LSMH) |
| 19 | 850 MHz (L800) |
| 20 | 800 MHz (DD) |
| 25 | 1900 MHz (E-PCS) |
| 26 | 850 MHz (E-CLR) |
| 28 | 700 MHz (APT) |
| 38 | 2600 MHz (IMT-E) |
| 39 | 850 MHz (E-CLR) |
| 40 | 2300 MHz (S-Band) |
| 41 | 2500 MHz (BRS) |
Note that the Quectel EG25-G does not support LTE band 48 (CBRS 3500MHz), used in the US for unlicensed 4G/5G connectivity.
Installing
Download and extract the installer on a shell on the PinePhone itself. Unlike other Rayhunter installers, this has to be run on the device itself. Then run:
./installer pinephone
Accessing Rayhunter
Because the modem does not have its own display or network interface, Rayhunter is only accessible on the pinephone by forwarding tcp over adb.
adb forward tcp:8080 tcp:8080
Shell access
Use this command to enable adb access:
./installer util pinephone-start-adb
adb shell
Power saving (disable adb)
The modem won't be able to sleep (power save) with adb enabled, even if Rayhunter is stopped. Disable adb with the following command:
./installer util pinephone-stop-adb
KonnectONE Moxee Hotspot (K779HSDL)
Supported in Rayhunter since version 0.6.0.
The Moxee Hotspot is a device very similar to the Orbic RC400L. It seems to be primarily for the US market.
These devices have relatively little storage. The Orbic is usually a better alternative, though might be more expensive.
Supported bands
According to FCC ID 2APQU-K779HSDL, the device supports the following LTE bands:
| Band | Frequency |
|---|---|
| 2 | 1900 MHz (PCS) |
| 4 | 1700/2100 MHz (AWS-1) |
| 5 | 850 MHz (CLR) |
| 12 | 700 MHz (Lower SMH) |
| 13 | 700 MHz (Upper SMH) |
| 25 | 1900 MHz (Extended PCS) |
| 26 | 850 MHz (Extended) |
| 41 | 2500 MHz (TDD) |
| 66 | 1700/2100 MHz (E-AWS) |
| 71 | 600 MHz |
Installing
To get started, follow the release installation guide. Then run the installer with the following command:
./installer moxee --admin-password 'mypassword'

# Note: the arguments --admin-username 'myusername' and --admin-ip 'mydeviceip'
#       may be required if different from the default.
- The password is the one used to log in to the device's admin menu. You can reset the password by pressing the button under the back case until the unit restarts.
- Note: If you have changed the device username, password, or IP address from their default values, these must be provided as arguments to the installer command above.
- On Moxee-brand devices, check under the battery for the password.
./installer moxeeis almost the same as./installer orbic, it just comes with slightly better defaults that will give you more space for recordings.
The Rayhunter UI will be available at http://192.168.1.1:8080.
Obtaining a shell
After running the installer, there will not be a root shell and ADB will not be enabled. Instead, you can use:
./installer util orbic-shell
REST API Documentation
The rayhunter daemon has REST API documentation available in the interactive swagger-ui.
Note: API endpoints are subject to change as needs arise, though we will try to keep them as stable as possible and notify about breaking changes in the changelogs for new versions.